Create Simulation
The easiest way to create a new simulation is to use the 'New' menu in the CppModel workspace. To better understand the structure of a simulation, this guide also demonstrates a completely manual method of creation.
Using the CppModel Workspace Menu
In the CppModel workspace, select the 'New' menu and click the 'Simulation' button. This will open a new simulation properties dialog, where you can configure the 'Name', 'Total time', and 'Cycle time'. Once configured, click the 'Create' button. The simulation file will then be created and downloaded by the browser.
Manual Setup
Create a new .cpp file and write the following code:
#include <cppmodel/Simulation.h>

class FirstSimulation : public CppModelBase::Simulation
{
  public:
  FirstSimulation()
  {
    // Assign name to be visible in the GUI
    name = "FirstSimulation";

    // Set run parameters
    time = 360.;
    stepSize = 1.;
  }

  void RunCyclic(double stepTime) override
  {
    // Define the inputs to be visible in the GUI
    inputs["t"] = (stepTime * M_PI) / 180.0;

    // Use native types for clarity
    double t = inputs["t"];

    // Define simulation logic
    double y = sin(t);

    // Define the outputs to be visible in the GUI
    outputs["sin(t)"] = y;
  }
};
In the constructor of the simulation, there are three important parameters:
-
name: This parameter specifies which simulation is being run. After execution, the simulation will appear in the simulation list in the workspace. Clicking the 'Visit Simulation' button will display the simulation graph on the screen.
-
time: This parameter defines how long the simulation should run (in seconds), as if it were running in a real system. -
stepSize: This parameter configures how often theRunCyclic(double stepTime)method will be called, simulating the cycle time of the task.
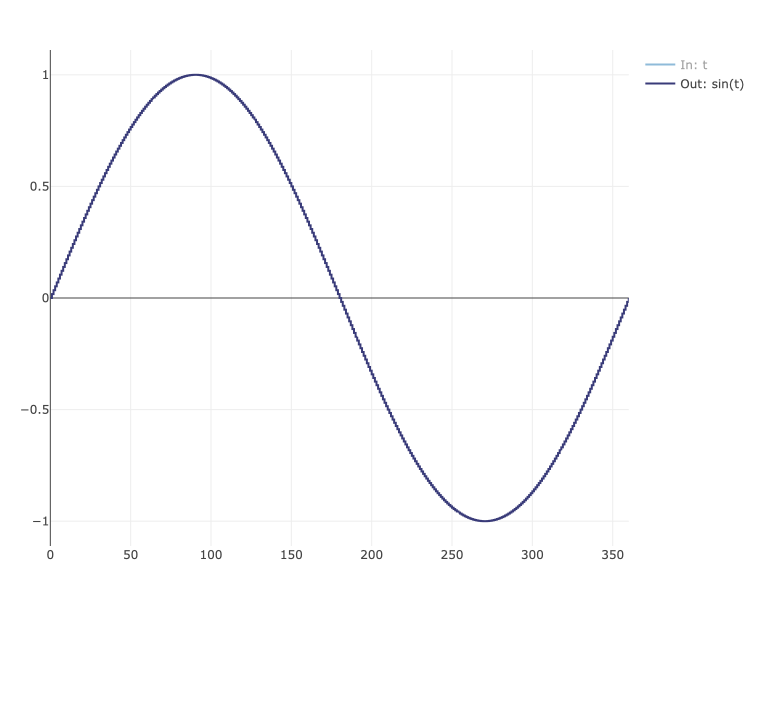
The RunCyclic(double stepTime) method contains the logic to be executed. With the current configuration, it will be called every second for a total of 360 seconds. Within this method, you can define a set of inputs and outputs to instruct the workspace on which data to display on the simulation graph. Each input and output must have a unique name. The following image shows the simulation graph for the current simulation:

For completeness, the simulation in this documentation and the one generated from the CppModel workspace file are followed by a simple simulation runner. In this example, the runner is implemented as a simple main() program:
int main(void)
{
  FirstSimulation simulation;
  simulation.Run();

  return 0;
}
Compiling the Simulation
To compile the simulation properly, you need to link the CppModelBase, ssl, and crypto libraries on Linux. On Windows, you also need to link the crypt32 and ws2_32 libraries. Additionally, to use a secure connection, you must define CPPHTTPLIB_OPENSSL_SUPPORT.
Here is an example CMakeFile to assist with the build process:
project(FirstSimulation)

add_definitions(-DCPPHTTPLIB_OPENSSL_SUPPORT)

include_directories(../dependencies/cppmodel/include)
link_directories(../dependencies/cppmodel/lib)

add_executable(FirstSimulation FirstSimulation.cpp)

if (WIN32)
  target_link_libraries(FirstSimulation CppModelBase crypto ssl crypt32 ws2_32)
else()
  target_link_libraries(FirstSimulation CppModelBase crypto ssl)
endif()
Build the project with the following commands:
cmake . -Bbuild
cd build
make
Run the simulation:
./FirstSimulation
During the first run, a login link will usually be presented, allowing the simulation to connect to your workspace. This prompt will reappear if your token expires.
Adding Logic Verification
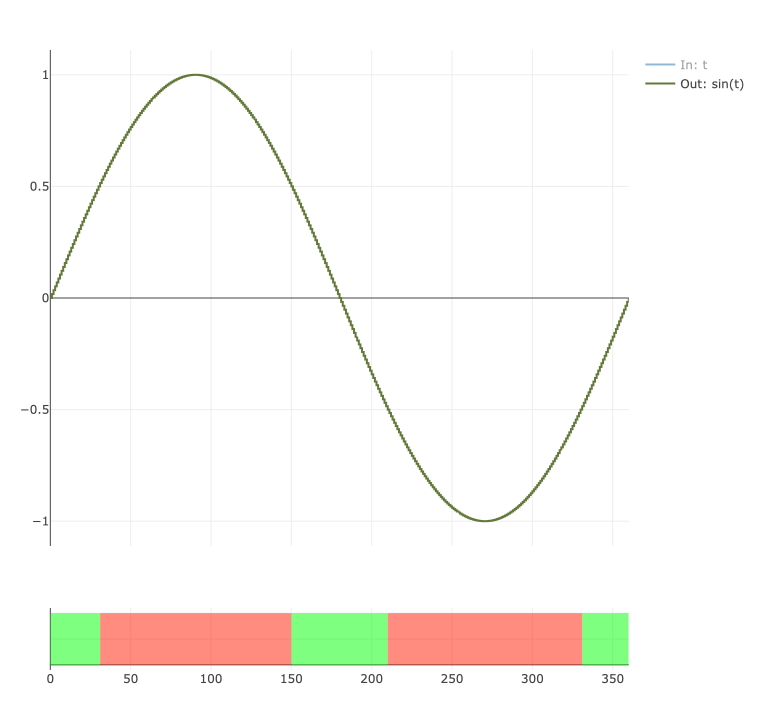
CppModel provides a way to present verification results on the simulation graph, which is useful for checking if and where the logic fails to run as expected. For this purpose, a special output called CppModel.StepResult is used. It accepts values 0 (invalid) and 1 (valid).
Here is an extended version of the RunCyclic() method with "failing" logic:
void RunCyclic(double stepTime) override
{
  // Define the inputs to be visible in the GUI
  inputs["t"] = (stepTime * M_PI) / 180.0;

  // Use native types for clarity
  double t = inputs["t"];

  // Define simulation logic
  double y = sin(t);

  // Define the outputs to be visible in the GUI
  outputs["sin(t)"] = y;

  outputs["CppModel.StepResult"] = (int)(abs(y) <= 0.5);
}
Running this updated simulation should produce a similar simulation graph, with an additional graph below the main results showing when the simulation ran as expected (green) and when it failed (red).

Conclusion
Creating a simulation in CppModel can be done either through the workspace menu for simplicity or manually for greater control. By following the steps outlined in this guide, you can set up, compile, and run your simulation while also adding logic verification to ensure its correctness. With these tools, you can build robust simulations and visualize their behavior effectively in the CppModel workspace.