So, how do you fill a glass of water?

I am starting this blog series with one of the simplest processes I could imagine. We do it every day and rarely stop to think about how it actually happens.
Take a glass, open the tap, and when the water level is high enough, close the tap. It sounds simple. It feels simple. Yet if we try to explain this process precisely enough for a machine to do it automatically, it turns out to have real structure underneath — the same structure engineers use to control much bigger things, like a thermostat keeping a room at the right temperature or a cruise control keeping a car at the right speed.
The glass itself
Let's start with the thing being controlled — the glass. In engineering, we'd call this "the plant," but really it's just whatever we're trying to influence.
The idea is simple: the more water flows in, the fuller the glass gets, until it's full — after that, no matter how much more water flows, the glass doesn't get any fuller (it just overflows). So the glass's behavior can be described as a simple rule: given how much water is flowing in, and how full the glass already is, figure out how full it will be a moment later.
Written as a function, that rule looks like this:
volume = glass(capacity, filledVolume, waterFlow)
Breaking this into the four parts we'll use consistently throughout this post:
Settings, decided ahead of time and fixed while the process runs:
capacity— the size of the glass
State, what the process remembers from one check to the next:
filledVolume— how full the glass currently is
Input, what changes moment to moment from outside the process:
waterFlow— how fast water is pouring in right now
Output, the result handed back:
volume— the new fill level, after this moment's flow has had a chance to add water; this becomes the State going into the next check
Since a computer checks on things at discrete moments in time rather than continuously, we also need to say how much time has passed since the last check, dt:
volume = glass(dt, capacity, filledVolume, waterFlow)
And here's what that looks like as actual code — you don't need to be a programmer to follow the gist: add the water that flowed in during this brief moment, then cap the result at the glass's capacity so it doesn't "overflow" mathematically:
float glass(float dt, float capacity, float filledVolume, float waterFlow)
{
    float deltaVolume = waterFlow * dt;
    filledVolume += deltaVolume;
    if (filledVolume > capacity)
    {
        filledVolume = capacity;
    }
    return filledVolume;
}
Now that we have a model of the glass, we can simulate it with different steady flows. Here I fill a 250 ml glass three times, with the tap running at 5, 10, and then 10 liters per minute. Here's how each fill plays out over time:
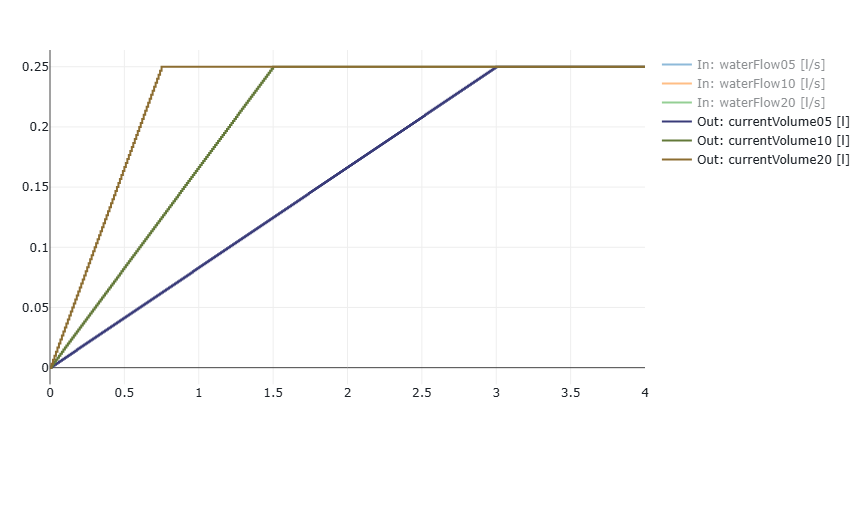
Unsurprisingly, each run is a straight line climbing up to the glass's capacity, with a steeper slope for a faster flow. If you tried pouring at different, changing speeds — the way you probably experimented as a kid — you'd get more interesting, curvier lines. That's actually a common way engineers test a system: run it under different conditions and watch what happens.
This little piece of code is about as small as a model gets, and it happens to be written in the same programming language (C) that's often used for the real control logic driving mobile or even industrial machines. The same code would run just as well on a hobbyist kit like an Arduino or Raspberry Pi.
The controller: deciding how far to open the tap
The controller is the part that decides what to do next. It looks at the gap between "how full we want the glass to be" and "how full it actually is" (we'll call that gap the error), and decides how far open the tap valve should be, as a percentage.
Think about how you actually do this by hand: when you start filling a glass, you open the tap a little, then gradually more, to avoid splashing — and as you get close to the level you want, you start closing it, finishing with a firm close right at the target. Often you close much faster than you opened: spilling is a concern with the first drops of water, not the last, so once you're near the target there's no need to stay gentle. In engineering terms, this is a controller whose behavior is different depending on whether it's opening or closing — a very ordinary thing for real controllers to do.
Here's the shape of that idea, again as a function:
opening = control(openingSlope, closingSlope, actualOpening, error)
Breaking this into the same four parts:
Settings, decided ahead of time:
openingSlope— how quickly the valve opens, in percent per secondclosingSlope— how quickly the valve closes, in percent per second
State, what the controller remembers between checks:
actualOpening— how far open the valve currently is
Input, what changes moment to moment:
error— the gap between the desired and actual water level
Output, the result handed back:
opening— the updated valve position; here it's the same value as the State above, since the valve position is both what the controller needs to remember and what it reports back to the rest of the system
Turning this into code, the controller nudges the valve open a bit if the glass isn't full enough yet, or closed a bit if it's gone past the target — always keeping the valve position between fully closed (0%) and fully open (100%):
float control(float dt, float openingSlope, float closingSlope, float actualOpening, float error)
{
    if (error > 0) // we need to open the tap
    {
        actualOpening += openingSlope * dt;
        if (actualOpening > 1.0) // limit to 100%
        {
            actualOpening = 1.0;
        }
    }
    else if (error < 0) // we need to close the tap
    {
        actualOpening -= closingSlope * dt; // error is negative, so this will decrease actualOpening
        if (actualOpening < 0.0)            // limit to 0%
        {
            actualOpening = 0.0;
        }
    }
    return actualOpening;
}
To check that this behaves sensibly, I simulated a 2-second burst where the error is pinned at 100% (as if the glass were completely empty and we wanted it completely full), using:
- opening speed: 100% per second
- closing speed: 200% per second
Here's the result:
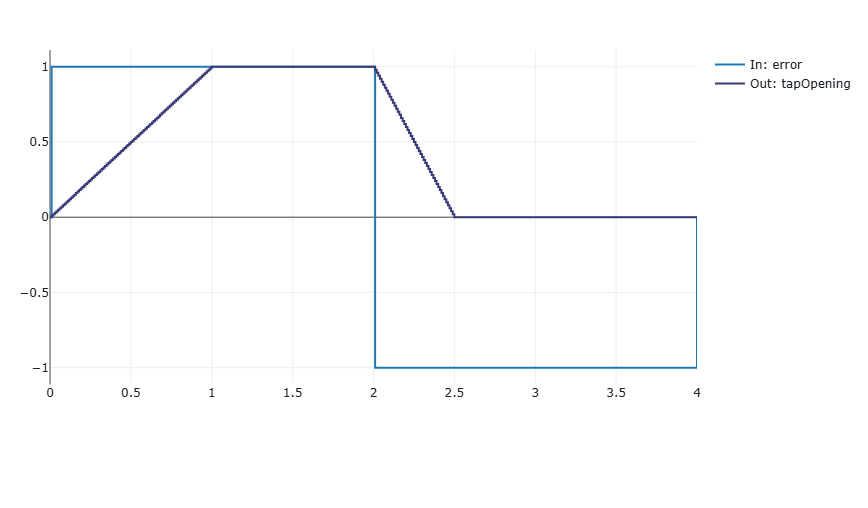
With both pieces defined — the glass and the controller — we can connect them into a complete, self-correcting loop: the controller looks at the gap between the desired and actual level and adjusts the valve; the valve's opening determines the flow rate; and that flow rate is what fills the glass.
The go-betweens: sensor and actuator
Two more small pieces connect the controller to the glass: a sensor and an actuator. They're not part of the "thinking" — they just translate between units.
The sensor converts the glass's water volume into a fill percentage (relative to its capacity) — like your eyes glancing at the glass and judging "it's about 80% full." The actuator converts a desired valve-opening percentage into an actual flow rate — like your hand turning the tap. In real life, sensors and actuators have their own quirks and delays, but for this example we'll treat them as perfect.
Fitting these into the same four parts, both are simpler than the glass or the controller: neither needs State, since neither has to remember anything between checks — each just turns its Input into an Output using a fixed Setting:
- sensor — Settings:
capacity; Input:filledVolume; Output: fill percentage - actuator — Settings:
maxFlow; Input:valveOpening; Output: flow rate
Here's what they look like in code — each is just a one-line conversion:
float sensor(float capacity, float filledVolume)
{
    return filledVolume / capacity;
}

float actuator(float maxFlow, float valveOpening)
{
    return maxFlow * valveOpening;
}
Putting it all together
Before wiring everything up, let's be clear about the goal: when you walk up to the tap, your intention is usually to fill the glass to some target, say 80% full. That target is called the setpoint.
In real life, your eyes are the sensor, judging the fill level, and your hand is the actuator, opening and closing the valve to some flow rate between zero and the maximum the plumbing can deliver. You probably don't think about that maximum flow much, but it's usually enough to fill a small glass in about a second — here I'll use 15 liters per minute. Put together, the controller's job is: look at the gap between the desired and actual level, and output how far open the valve should be. Here's what that whole system looks like as a block diagram:
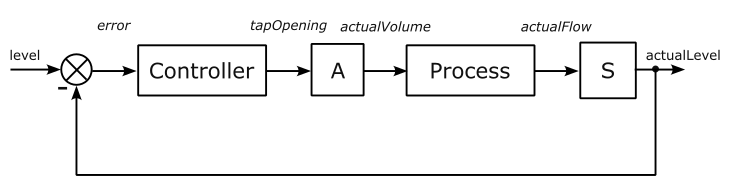
I simulated this full system aiming for 80% full, with:
- Glass capacity: 250 ml
- Opening speed: 100% per second
- Closing speed: 400% per second
- Maximum tap flow: 15 liters per minute
With the rest of the functions already sitting in a file called GlassOfWaterLib.c (and its header, GlassOfWaterLib.h), here's the simulation code that wires them together using the CppModel framework — all in under 50 lines:
#include "GlassOfWaterLib.h"

#include "cppmodel/CModel.h"

float tapOpening = 0.0f;
float actualVolume = 0.0f;
float actualLevel = 0.0f;
float actualFlow = 0.0f;

void RunCyclic(CModelSimulation_ts *ctx, unsigned long cycleTime)
{
    float dt = ctx->stepTime_ms / 1000.0f; // Convert milliseconds to seconds

    float plumbingFlow = CppModel_getParameterF32(ctx, "plumbingFlow [l/min]", 15.0f) / 60.0f;   // Default plumbing flow is 15 liters per minute converted to liters per second
    float glassCapacity = CppModel_getParameterF32(ctx, "glassCapacity [ml]", 250.0f) / 1000.0f; // Default glass capacity is 250 ml converted to liters
    float openingSlope = CppModel_getParameterF32(ctx, "openingSlope [%/s]", 100.0f) * 0.01f;    // Default opening slope is 100% per second converted to a fraction
    float closingSlope = CppModel_getParameterF32(ctx, "closingSlope [%/s]", 400.0f) * 0.01f;    // Default closing slope is 400% per second converted to a fraction

    float desiredLevel = CppModel_getInputF32(ctx, "desiredLevel [0.01%]", 80.0f * 0.01f); // Default desired level is 80%

    // Control loop
    float error = desiredLevel - actualLevel;
    tapOpening = control(dt, openingSlope, closingSlope, tapOpening, error);
    actualFlow = actuator(plumbingFlow, tapOpening);
    actualVolume = glass(dt, glassCapacity, actualVolume, actualFlow);
    actualLevel = sensor(glassCapacity, actualVolume);

    CppModel_setOutputF32(ctx, "error [0.01%]", error);
    CppModel_setOutputF32(ctx, "tapOpening [0.01%]", tapOpening);
    CppModel_setOutputF32(ctx, "actualFlow [l/s]", actualFlow);
    CppModel_setOutputF32(ctx, "actualVolume [l]", actualVolume);
    CppModel_setOutputF32(ctx, "actualLevel [0.01%]", actualLevel);
}

int main()
{
    CModelSimulation_ts *sim = CppModel_create("Glass of Water", 2000, 10);

    CppModel_setRunStepFunction(sim, RunCyclic);

    CppModel_Simulate(sim);

    int result = CppModel_getSimulationResult(sim);

    return result;
}
Here's how it behaves over time:
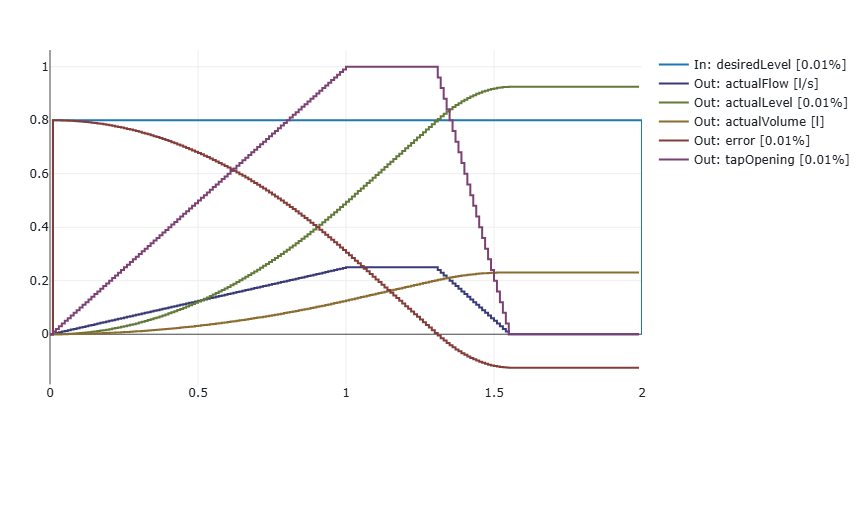
You can see the glass filling as soon as the tap opens, and as it nears the 80% target, the tap starts closing. Because it closes faster than it opened, the system still slightly overshoots the target before settling. Tuning those opening and closing speeds can reduce that overshoot and make the fill smoother.
Final notes
I chose to simulate this entire system directly in a general-purpose programming language, without any specialized physics or simulation software, to show just how little machinery is needed to model and test a real process — even one as ordinary as filling a glass. The same approach scales up to far more complex systems; the underlying ideas don't change. By understanding how the thing you're controlling behaves, and designing a controller that responds sensibly to it, you can get useful, predictable behavior out of all kinds of automated systems.
Keeping the simulation this lightweight also means it can double as the real production code and be run automatically as part of a software testing pipeline. And as AI tools become part of more engineering workflows, keeping the simulation and the real control logic written in the same language makes it easier to bring those tools to bear on implementing and improving the system.
If you enjoyed this and want to run your own simulations, please consider subscribing to one of our plans. I've prepared an archive with the code and data used in this post, ready to run all the simulations in this article. I'll be continuing this series with more processes and control systems, so let me know your thoughts — or how you'd have approached this differently.